
Hints & Help for SkyIMD’s Online Flight Planner
SkyIMD’s Online Flight Planner is located here: Online Flight Planner
October 20, 2023 – Added Namibia Elevation Data & Phase One iXM-GS120 Camera
As we improve the application, we’ll improve this help page.
A list of the most recent updates and modifications can be found at the bottom of this page. Note: we recently added Litchi as an output format – it’s not perfect and we’ll be testing this over the next month or so.
Note: there are a few known issues with the application. There’s a good chance you may encounter one or a few of them along the way. If you get stuck, just hit the reload button on your browser to start new.
For a successful experience, keep it simple – use closed polygon’s, upload .KML files with a single polygon/parcel.
We’re working on error checking and graceful failures. Please be kind with your feedback.
Getting Started
- Create and save .KML polygon (boundary) using Google Earth. (https://earth.google.com/intl/earth/download/ge/agree.html)
- Import saved .KML polygon into Sky IMD’s Flight Planner
- Adjust camera and flight parameters as desired, save flight plan as .KML, .GPX or LITCHI .CSV format
Note: Some third party exported .KML files may not work inside the flight planner – recreate the boundary using Google Earth for best compatibility.
If you’re unfamiliar with flight planning applications for aerial mapping, aerial surveying and aerial photogrammetry, here’s a brief overview of the user interface:
The region on the left side contains all the settings and selections needed to to calculate the main items:
- Ground Spatial Distance (GSD)
- Lateral Flight Path Distance
- Image Distance Interval
- Motion Blur (Oct. 2019)
Select a camera or enter custom image sensor information. Adjust the Altitude and Speed that you plan to fly. Select Forward and Side Overlap. As you do this you’ll notice that real time results are being calculated based on your entries or selection.
For typed input, the calculations will automatically occur 3 seconds after you’ve stopped typing.
Motion Blur – adjust altitude, speed, focal length and shutter speed to obtain the least amount of motion blur as possible. Under 2 pixels is ideal.
NOTE: Use .KML files created and exported with Google Earth. .KML files exported from third party applications may not import correctly
After importing a KML, a flight plan will be calculated for the parcel boundary (polygon) and both will be displayed in the main section of the page.
What is a KML file?? Most folks use Google Earth (free) to draw a parcel boundary (closed polygon) on a map, then save this as a KML file from within Google Earth. Search for “kml file” on Google and learn more.
Note: KML files can be very complicated with markers and lines and such. Items other than closed polygons may cause this application at this development stage to hang up or crash or display continuous pop up messages. If that happens, reload the web page of the application and start new (and use a different KML file).
The handle of a slider is highlighted by clicking on it. Then use left and right arrow keys to adjust with finer control.
If you import a KML that has multiple polygons, the app will try to select the one that contains the largest area. If you import a KML with paths only, you may not see anything drawn on the map.

Feel free to Import a KML file before tinkering with the settings. The first flight plan will use the default settings.
Hint: click on the handle of the slider and use your left and right arrow keys to increase or decrease AGL or Groundspeed with finer control.
If you adjust any of the settings on the left side, the flight plan on the map will be updated dynamically!
Map Options

The map options section of SkyIMD’s online flight planner
This region above the map only appears after a KML file has been imported. It includes
- Import KML Boundary – import a new/different KML file and have all your current settings applied to the new parcel. Yay! No need to re-enter data all the time! If you’re mapping many different parcels at the same settings like we do, this will speed up your pre-flight planning.
- Lead-in – measured in meters, this will add “this many meters” to the ends of each flight path. If you fly manned fixed wing aircraft like we do, this is helpful to line up the plane along the path prior to getting to the imaging area. The paths will update 3 seconds after you stop typing.
- Heading – When you first import a KML boundary, the heading is calculated from the Longest Edge of the polygon and the flight paths follow that direction. Enter a new heading in the input box the flight paths will be updated to follow the new heading.The paths will update 3 seconds after you stop typing.
- Quick 90º icon – This will adjust the heading 90º from the current value. If you need to make a quick cross hatch flight plan, this will save you from doing some math in your head.
- Join Paths – Check this box if you want the paths to be joined at opposite ends. This will create a single path that may be more useful for those who use drones to aerial image map. (Dec. 4, 2020)
- Nudge>> Buttons – Clicking on these buttons will “nudge,” or shift, the paths one way or the other so that you can fine tune how they fall over an area. Each click will nudge the paths 5% of the Flight Path Separation (as shown in the Results box on the left side of the page). If you click more than twenty times in the same direction, an alert will display informing you that you reached the limit in one direction, click the other Nudge button to go the other way. Nudge direction is relative to heading and it may appear that the paths are moving opposite the nudge direction depending on heading direction.
- Help Button – takes you to this page.
Map Data

This region above the map only appears after a KML file has been imported.
This region between Map Options and the Map contain various data points about the parcel and the plan.
We call these “data blocks.” Data blocks only appear when a flight plan is created. They show different data points about each boundary and flight plan. Any adjustments you make can affect the data (e.g. Total Images may change if you change the heading). We will add to this data in the future.
Click on the download buttons to download flight paths, or flight paths with camera trigger points. Select KML or GPX or LITCHI (beta 20230909) file format from the select menu prior to clicking a download button.
Litchi format: Litchi CSV files have been uploaded and tested at flylitchi.com mission hub, but we are not drone folks, and have not tried it with a drone yet. If you use the Litchi format make sure you review the file thoroughly prior to using it with your drone – we are not responsible for any errors that affect your drone. Make sure you check elevations for each photo point – if the elevation is “0,” copy the previous point’s elevation into the point that has zero elevation.
Editing Litchi CSV files
We follow waypoint format as described here: https://flylitchi.com/help#waypoints-p3.
actiontype1 and actionparam1 are for the first action of the waypoint
actiontype2 and actionparam2 are for the second action of the waypoint
etc.. until 15 because a waypoint can have max 15 actions
- -1 for actiontype means no action,
- 0 means “Stay For”
- 1 means “Take Photo”
- 2 means “Start Recording”
- 3 means “Stop Recording”
- 4 means “Rotate Aircraft”
- 5 means “Tilt Camera”
actionparam is the time in milliseconds for “Stay For”, and the angle in degrees for “Rotate Aircraft” and “Tilt Camera”
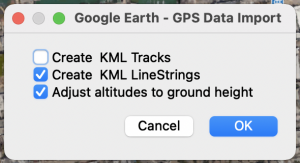
GPX Note: If you plan to review the GPX file in Google Earth, select the options as shown in the following dialog:
What is Long Edge Heading?
Long edge heading is the heading of the longest edge of the polygon you imported. When flights paths are first calculated and drawn over the parcel, they will use this edge’s heading. If you change the heading, use this data point as reference to move it back to the original direction.
Terrain Data Blocks
![]()
If your parcel is in an area that has elevation data available, terrain data blocks will appear and display the terrain elevation variation, max elevation and minimum elevation inside the boundary. Terrain elevation data is approximate and based on image “trigger locations.”
Terrain data will be shown in Meters or Feet, depending on the AGL radio button selection.
Elevation Data
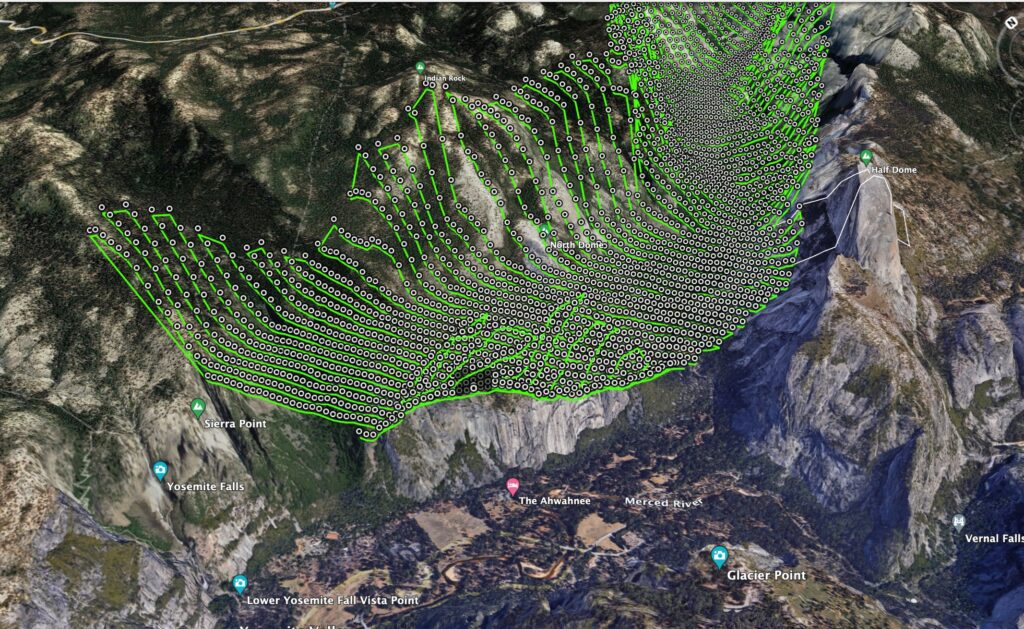
Screen shot of KML elevation data in Google Earth (Yosemite Valley, CA)
February 26-July 2022: We have released limited support for All US States including Hawaii and Alaska (Alaska below 60N), New Zealand, Portugal, the Bahamas, Costa Rica, Puerto Rico, Kenya, Czechia, Denmark, Germany, Netherlands, Ireland, United Kingdom, select areas of India (Delhi, Hyderabad, Bengaluru, Mumbai) and South Georgia-South Sandwich Islands. More will be added as we continue to test and evaluate.
To include elevation data with your plan, download a KML file with “Paths with Trigger Points.” Check the “join paths” box if you want a contiguous flight path. If elevation is available, each image location will contain elevation data, including altitude (AGL), heading, and ground elevation.
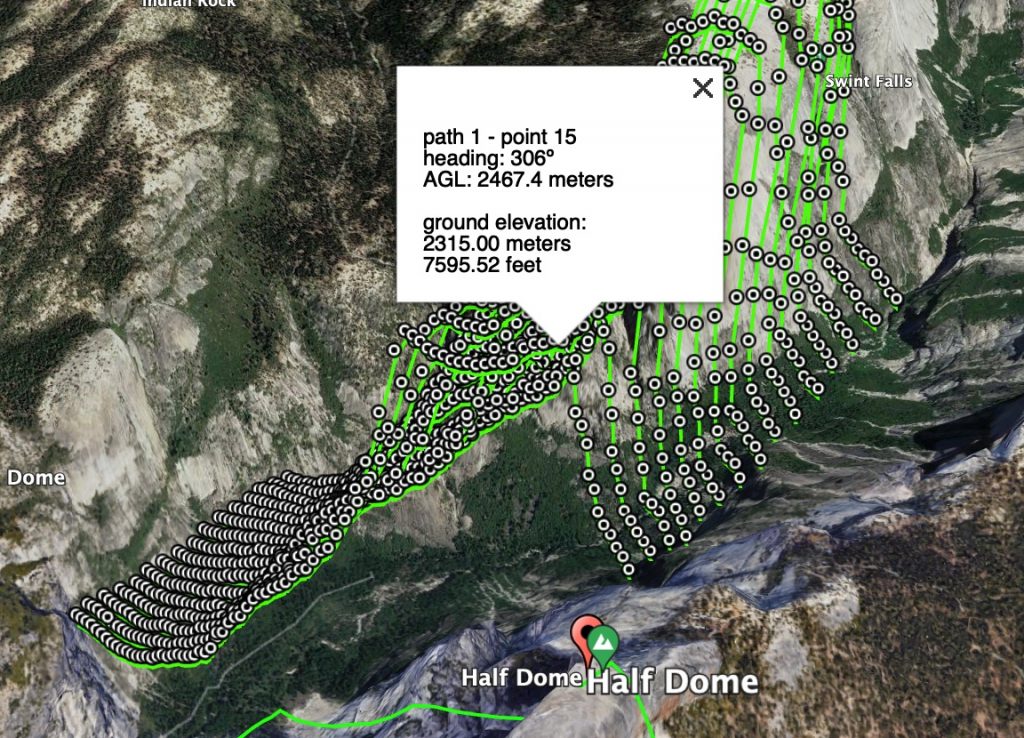
Elevation Data as shown in Google Earth
Note: if your flight paths straddle an area with elevation data and an area without elevation data, then the resulting plan may not contain elevation data – elevation data for a point is unavailable (SRTM “void”). The elevation data for the point, or the entire plan, may appear as “N/A” inside the file (“not available.”).
The data we use is 1 Arc-Second Global data, read about it here: https://www.usgs.gov/centers/eros/science/usgs-eros-archive-digital-elevation-shuttle-radar-topography-mission-srtm-1.
Note: Please review in Google Earth to ensure all points have proper elevations prior to using for real life planning. This is a feature in development and there may be some anomalies.
Feedback regarding elevation data, and how you would like to see it delivered in the downloaded files (.KML and .GPX and Litchi .CSV) is appreciated (admin[at]skyimd[dot]com).
Very Large Parcels
Very large parcels may take a few seconds to render on the screen. Until the flight plan is displayed, the user interface may appear to be unresponsive. It’s best to adjust your camera and flight parameters first, then import the very large parcel KML file.
If the user interface seems to lock up for an extended time, refresh your browser and try again. Or try reducing the size of the parcel.
Extremely large parcels are best saved as “flight paths” only.
Very large parcels that are saved “with trigger points,” may take some time to open and review in Google Earth.
Tips
GPX Files Not Being Imported Correctly
If your application is unable to read our .GPX files correctly, it may be due to the style of markup used. SkyIMD and other applications (such as GPSBabel) output GPX files using Track Point <trkpt> markup. Some applications utilize Route Point <rtept> markup.
A possible solution would be to change SkyIMD’s <trkpt> to <rtept>. Here’s how that is accomplished:
-
-
- Check the “JOIN PATHS” box and Save in GPX file format.
- Open the SkyIMD created GPX file in a text editor and follow these steps in order
- Search for ‘trkpt’ and replace with ‘rtept’
- Search for ‘trk’ and replace with ‘rte’
- Save file, or SaveAs… with “…rte” in the filename so you can tell them apart
- Try importing the modified file into your application
-
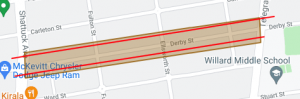
Working with Thin Parcels – Corridors and Streets (no paths appear)
If you import a thin boundary and no paths appear, use the NUDGE arrows to nudge it into place.


If you want two paths on each side of the corridor or street, adjust the side overlap percentage and use the nudge buttons to position the paths on either side of the corridor or street.
![]()
Total Run Length (all paths combined) is Different compared to Google Earth’s Measurement
This is more apparent if flight paths are joined. Our online calculator does not (yet) compensate for the connecting paths between the main flight paths. Our flight paths calculate the distance between the first image in the path and the last image in the path, in a straight line.
Questions & Answers
We’ll add to this section as real questions and comments come in. For now we’ll use anticipated questions and real answers (e.g. Frequently Anticipated Questions … FAQ’s).
Why did SkyIMD release a “not so perfect” version of this product?
If we waited until it was final, it could be several months before we got enough testing in to make sure we addressed all the issues to get to beta stage. That would have also opened the door for “feature creep,” the “constant addition of new and exciting features and ideas” which would have continued to delay the release.
There are several flight planning applications on the market, some are a bit expensive, and some are more robust. We built this one so we can run it anywhere (on our Mac’s, in the plane on our flight laptops/Windows, etc.) where we have an internet connection (which is, oddly enough, readily available at 1,800 ft. AGL where we fly most). Perhaps other flight planning software developers will improve their applications based on some of the ideas presented here and everyone will benefit.
The Interface, it’s so… PLAIN!
Yeah, well, at least it’s functional and hopefully unambiguous. This isn’t really one of those applications that you’re going to stare at all day, it’s a productivity tool. Think of it as your dynamic flight planning spreadsheet. Spreadsheets aren’t pretty either (though some of you do look at them all day… why?). Just calculate the plans based on the data entry and go fly!!!
When we finally get to beta stage, we’ll start looking at making the user interface a bit more appealing.
Why did SkyIMD create this application and why is SkyIMD making it available at no charge?
SkyIMD’s flight planner application was developed as an internal tool for planning our own aerial imaging and mapping flights. We had been using a commercial application, but were frustrated at times by the constant re-entry of data to view iterative results. Creating a dynamically updating map was crucial to stem our hair loss.
Workflow is key and speeding up workflow makes us all more productive. Deciding to make this available at no charge lessens the expectation of perfection and immediate technical support if something is amiss.
We’ll still endeavor to address issues quickly, but we have other things to do. Like building some pretty cool camera and sensor configurations for customers that acquire our FAA/EASA/ANAC certified aerial camera and sensor mounts for manned aircraft (e.g. shameless plug for our main business).
SkyIMD may change the business model in the future, especially if we get high use rates and Google starts charging us for use of their Maps API. For now, it’s a fun project that in turn helps our customers (and hopefully everyone else in the aerial mapping business).
Did SkyIMD use Google Map’s API? How’d that go?
Yes. It was challenging and fun. Google publishes the API specs and, well, we just had to read them. We think we came up with some novel approaches to solving some of the flight planning needs, though all the heavy lifting is performed by Google Maps API.
Once we had an idea of what we wanted to do, the bulk of the coding was done over the course of two weekends (our only free time at the moment). The code ain’t pretty, we still need to do a ton of refactoring.
There’s a limit to the number of API requests we can make. We’re wondering when we’ll need to start paying for higher limits? Maybe that’s when we’ll ask for contributions or change the business model… or not.
Where to send feedback or comments?
admin[at]skyimd.com. This mailbox receives the least amount of email and it’s feeling slightly undervalued. The good thing is that it will be easy to sort through feedback and comments because this account also receives the least amount of junk mail (until maybe now, I suppose).
Do you want to know about bugs?
Sure. There are several. Please keep it simple though – use closed polygon’s and KML files with only polygon data.
If you try to break it, you’ll probably succeed. If you send an email, please don’t be offended if we don’t respond.
What’s Next?
First we need to get this one stable, then we’ll look at deploying other online apps for the aerial imaging, mapping and data market.
Updates/Modifications/Changes
December 29, 2023 – Minor Bug Found – Sometimes the Motion Blur calculation does not update correctly. Work-around: If this happens to you, select a slower shutter speed, then select the shutter speed that you want, and then Motion Blur should update correctly. This is a low priority issue and we will address it when we have some time available.
October 20, 2023 – Added Namibia Elevation Data & Phase One iXM-GS120 Camera
September 26, 2023 – Added Greece, South Australia, New South Wales, Tasmania, and large area around Perth Australia, Elevation SRTM support
September 9, 2023 –
- Added LITCHI format for download
- Litchi format is a .CSV file and is the same file whether or not you select download PATHS or download TRIGGER POINTS.
- Since we are not as familiar with this format, there may be a few errors, please double check by opening the .CSV file and checking and correcting any data prior to importing into LITCHI or your drone
- Added elevation data for Buenos Aires; Limited to ~120 mile radius from the City.
August 19, 2023 –
- Reduced nudge percentage to 5%
- Reversed path “point number sequence” for joined paths
- Reversed path “point number lat and long” for joined paths – so each subsequent trigger point along a long joined path is the next logical GPS coordinate to move to
- Added GSD Variance to the javascript console – this is the GSD variance if flown at a constant MSL altitude.
August 13, 2023 – Added SRTM Elevation data for New Zealand
December 20, 2022 – Added SRTM Elevation data for Belarus and Western Russia (limited)
December 2, 2022 – Added SRTM Elevation data for limited areas in India – including parts of Delhi, Mumbai, Hyderabad, & Bengaluru.
October 4, 2022 – Added FUJI GFX 100S and 50S cameras
July 9, 2022 – Added SRTM Elevation data for Portugal.
March 24, 2022 – Fixed a bug where a second .KML boundary wouldn’t render on import. This had to do with an issue with zoom level and fitting the map to the boundary of the parcel (zoom to fit). Added Terrain Data Blocks when elevation data is available.
March 22, 2022 – Added SRTM Elevation data – refer to “Elevation Data” above for more information.
Elevation data is available for all US States including Hawaii and Alaska (Alaska below 60N).
Elevation data is also available for The Bahamas, Costa Rica, Puerto Rico, Kenya, Czechia, Denmark, Germany, Netherlands, Ireland, United Kingdom and South Georgia-South Sandwich Islands.
February 26-March 18, 2022 – Fixed a bug with exported .KML files that had joined paths. Found a bug with the Nudge and 90º rotate buttons – if they are pressed in rapid succession, paths may fail to draw (workaround: refresh page, re-import and press these buttons in slower succession until this is fixed).
Introduced limited area support for Elevation data as described above. Select “Paths with Trigger Points” to have elevation data included in the KML or GPX file. Using 1 arc-second SRTM’s data, rounding results. Interpolation creates some latency at the moment.
Fixed a bug where occasionally the heading was -180 on straight North-South lines, interfering with the operation of the quick 90º button. Phew, that was an annoying one.
Nudge percentage reduced to 10%
February 11, 2022 – Added FLIR sensors (Cooled MWIR and Uncooled LWIR)
June 7, 2021 – Added Sony A7 IV (user request)
June 2, 2021 – Added tip on using GPX files in other programs; Route Point vs. Track Point Markup.
March 2021 – Added Skydio2 Sony IMX577 sensor, fixed AGL slider when no map present.
February 2021 – Fixed a bug where KML and GPX formats were not being retained correctly.
December 2020 –
- Altitude limit raised to 20,000 ft. AGL / 6096 m AGL.
- Maximum parcel size raised to 1,000 square miles/2,590 square kilometers/640,000 acres. Very large parcels may take a moment to calculate. [user request for larger parcels]
- Removed the camera trigger points from the display. Trigger points are still available on the downloaded KML file.
- Join Paths – For a continuous path, check this box.
- Nudge Paths – Clicking these buttons will “nudge,” or shift, the paths in one direction or the other.
- Cleaned up the issues with miscellaneous paths being drawn outside the parcel boundary.
- Added GPX file format to download options.
June 2020 – Fixed a bug where the trigger point distance interval did not update on downloaded flight plan after camera and flight parameters were changed. Added Leica RC30 [user request]
January 2020 – added a few standard drone/UAS sensor options
October 2019 – added motion blur calculation/result
July 2019 – added custom entry for focal length and sensor dimension and pixel dimension [user request]